Install Piwik 3.1.1 Analytics Platform on Windows 7 localhost via XAMPP 7.0.23 ( php7 )

Trabla: Install Piwik 3.1.1 Analytics Platform  on Windows 7 localhost via XAMPP 7.0.23 ( php7 )

Install Piwik 3.1.1 Analytics Platform on Windows 7 localhost via XAMPP 7.0.23 ( php7 )


Piwik is a free and open source web analytics application written by a team of international developers that runs on a PHP/MySQL webserver. Piwik tracks online visits to one or more websites and displays reports on these visits for analysis. As of July 2017, Piwik was used by over 1,000,000 websites, or 1.3% of all websites, and has been translated to 54 languages.
Piwik displays reports regarding the geographic location of visits, the source of visits (i.e. whether they came from a website, directly, or something else), the technical capabilities of visitors (browser, screen size, operating system, etc.), what the visitors did (pages they viewed, actions they took, how they left), the time of visits and more.

Piwik Analytics Platform Official Site - https://piwik.org

Solving:


Watch on YouTube


1. Download and install XAMPP 7.0.23 with PHP7 from
official site: https://www.apachefriends.org/index.html

ATTENTION: NOT Work with XAMPP 7.1.9 !!!

Install Piwik 3.1.1 Analytics on Windows 7 localhost via XAMPP php7 tutorial 1

Install Piwik 3.1.1 Analytics on Windows 7 localhost via XAMPP php7 tutorial 2


Install Piwik 3.1.1 Analytics on Windows 7 localhost via XAMPP php7 tutorial 3

Install Piwik 3.1.1 Analytics on Windows 7 localhost via XAMPP php7 tutorial 4

Install Piwik 3.1.1 Analytics on Windows 7 localhost via XAMPP php7 tutorial 5

Install Piwik 3.1.1 Analytics on Windows 7 localhost via XAMPP php7 tutorial 6


2. Download Piwik 3.1.1 Web / Mobile Analytics Platform  source files
from official site: https://piwik.org/

Install Piwik 3.1.1 Analytics on Windows 7 localhost via XAMPP php7 tutorial 7

Install Piwik 3.1.1 Analytics on Windows 7 localhost via XAMPP php7 tutorial 8


3. Create folder \piwik in XAMPP  \htdocs folder

e.g. C:\xampp\htdocs\piwik

Install Piwik 3.1.1 Analytics on Windows 7 localhost via XAMPP php7 tutorial 9

Install Piwik 3.1.1 Analytics on Windows 7 localhost via XAMPP php7 tutorial 10

Install Piwik 3.1.1 Analytics on Windows 7 localhost via XAMPP php7 tutorial 11


4. Copy files from Piwik archive ( folder \piwik in archive ) into ...\htdocs\piwik folder

e.g. C:\xampp\htdocs\piwik

Install Piwik 3.1.1 Analytics on Windows 7 localhost via XAMPP php7 tutorial 12

Install Piwik 3.1.1 Analytics on Windows 7 localhost via XAMPP php7 tutorial 13


5. Run XAMPP

- start Apache
- start MySQL

Install Piwik 3.1.1 Analytics on Windows 7 localhost via XAMPP php7 tutorial 14

Install Piwik 3.1.1 Analytics on Windows 7 localhost via XAMPP php7 tutorial 15


6. Open browser and goto url  to start Piwik web installer

http://localhost/piwik/

Install Piwik 3.1.1 Analytics on Windows 7 localhost via XAMPP php7 tutorial 16

- click "Next" button

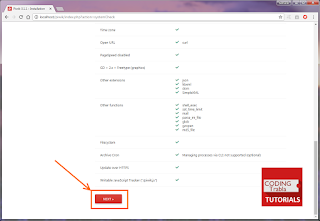
7. "System Check" page of  Piwik web installer

- scroll down

Install Piwik 3.1.1 Analytics on Windows 7 localhost via XAMPP php7 tutorial 17

- scroll down

Install Piwik 3.1.1 Analytics on Windows 7 localhost via XAMPP php7 tutorial 18


- click "Next" button

Install Piwik 3.1.1 Analytics on Windows 7 localhost via XAMPP php7 tutorial 19


7. "Database Setup" page of Piwik web installer

Install Piwik 3.1.1 Analytics on Windows 7 localhost via XAMPP php7 tutorial 20

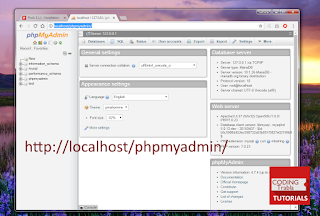
To continue we need to create database for Piwik in phpMyAdmin ( pre-installed in XAMPP )

- open new tab in browser and goto url

http://localhost/phpmyadmin

Install Piwik 3.1.1 Analytics on Windows 7 localhost via XAMPP php7 tutorial 21

- click on "SQL" tab in phpMyAdmin menu

Install Piwik 3.1.1 Analytics on Windows 7 localhost via XAMPP php7 tutorial 22

Install Piwik 3.1.1 Analytics on Windows 7 localhost via XAMPP php7 tutorial 23

- copy following SQL script  to create database and user for Piwik
into Query text area in phpMyAdmin

CREATE DATABASE `piwik` 
DEFAULT CHARACTER SET utf8 COLLATE utf8_general_ci;

CREATE USER 'piwik-owner'@'localhost'; 
CREATE USER 'piwik-owner'@'127.0.0.1';
CREATE USER 'piwik-owner'@'::1';

SET PASSWORD FOR 'piwik-owner'@'localhost' = PASSWORD('piwik123$%');
SET PASSWORD FOR 'piwik-owner'@'127.0.0.1' = PASSWORD('piwik123$%');
SET PASSWORD FOR 'piwik-owner'@'::1' = PASSWORD('piwik123$%');


GRANT ALL PRIVILEGES ON `piwik`.* TO 'piwik-owner'@'localhost' WITH GRANT OPTION;
GRANT ALL PRIVILEGES ON `piwik`.* TO 'piwik-owner'@'127.0.0.1' WITH GRANT OPTION;
GRANT ALL PRIVILEGES ON `piwik`.* TO 'piwik-owner'@'::1' WITH GRANT OPTION;


- click "Go" button

Install Piwik 3.1.1 Analytics on Windows 7 localhost via XAMPP php7 tutorial 24


- result of script execution

Install Piwik 3.1.1 Analytics on Windows 7 localhost via XAMPP php7 tutorial 25


- return to Piwik Database Setup page
enter database connection parameters

Install Piwik 3.1.1 Analytics on Windows 7 localhost via XAMPP php7 tutorial 26


8. "Creating the Tables" page of Piwik web installation

- click "Next" button

Install Piwik 3.1.1 Analytics on Windows 7 localhost via XAMPP php7 tutorial 27


9. "Super User" page of Piwik web installer

- enter Super User data and click "Next" button

Install Piwik 3.1.1 Analytics on Windows 7 localhost via XAMPP php7 tutorial 28


10. "Setup a Website" page of Piwik web installer

Install Piwik 3.1.1 Analytics on Windows 7 localhost via XAMPP php7 tutorial 29

To continue installation let's create single page site on localhost

- create folder \mysite in \htdocs folder

e.g. C:\xampp\htdocs\mysite\

Install Piwik 3.1.1 Analytics on Windows 7 localhost via XAMPP php7 tutorial 30

Install Piwik 3.1.1 Analytics on Windows 7 localhost via XAMPP php7 tutorial 31


- create new text file in \mysite folder

Install Piwik 3.1.1 Analytics on Windows 7 localhost via XAMPP php7 tutorial 32

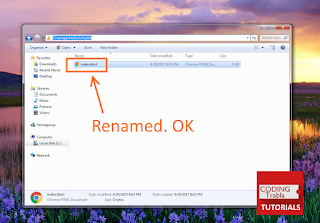
- rename text file to index.html

Install Piwik 3.1.1 Analytics on Windows 7 localhost via XAMPP php7 tutorial 33

Install Piwik 3.1.1 Analytics on Windows 7 localhost via XAMPP php7 tutorial 34


- edit index.html and put this simple html

Install Piwik 3.1.1 Analytics on Windows 7 localhost via XAMPP php7 tutorial 35


<html>

<head>

</head>

<body>
<h1>Wellcome to MySite !!!</h1>
</body>

</html>

Install Piwik 3.1.1 Analytics on Windows 7 localhost via XAMPP php7 tutorial 36

- in new browser tab goto http://localhost/mysite/ to check our simple site

Install Piwik 3.1.1 Analytics on Windows 7 localhost via XAMPP php7 tutorial 37

- back to "Setup Website" page of Piwik installer
type data as on screenshot and click "Next" button

Install Piwik 3.1.1 Analytics on Windows 7 localhost via XAMPP php7 tutorial 38

11. "Tracking code" page of Piwik web installer

Install Piwik 3.1.1 Analytics on Windows 7 localhost via XAMPP php7 tutorial 39

- copy tracking code for My Site

Install Piwik 3.1.1 Analytics on Windows 7 localhost via XAMPP php7 tutorial 40

- paste tracking code between <heade> </head> tags in index.html of My Site
+ save file

Install Piwik 3.1.1 Analytics on Windows 7 localhost via XAMPP php7 tutorial 41

Install Piwik 3.1.1 Analytics on Windows 7 localhost via XAMPP php7 tutorial 42

- scroll down  "Tracking code" page of Piwik web installer and click "Next" button

Install Piwik 3.1.1 Analytics on Windows 7 localhost via XAMPP php7 tutorial 43


12. "Congratulations" page of Piwik web installation

- click "Continue to Piwik" button

Install Piwik 3.1.1 Analytics on Windows 7 localhost via XAMPP php7 tutorial 44

Install Piwik 3.1.1 Analytics on Windows 7 localhost via XAMPP php7 tutorial 45


13. Sign in into Piwik

Install Piwik 3.1.1 Analytics on Windows 7 localhost via XAMPP php7 tutorial 46

Install Piwik 3.1.1 Analytics on Windows 7 localhost via XAMPP php7 tutorial 47


14. Open in different browsers http://localhost/mysite and see how Piwik shows stats

Install Piwik 3.1.1 Analytics on Windows 7 localhost via XAMPP php7 tutorial 48


Superb !!! Enjoy  Piwik 3.1.1 Analytics Platform !!!


No comments:

Post a Comment