Trabla: Install osTicket v1.9.14 open source support ticket system on Windows ( XAMPP 5.6.23 ) - Part 2/2

osTicket is a widely-used and trusted open source support ticket system, written on PHP. It seamlessly routes inquiries created via email, web-forms and phone calls into a simple, easy-to-use, multi-user, web-based customer support platform. osTicket comes packed with more features and tools than most of the expensive (and complex) support ticket systems on the market. The best part is, it's completely free.
Solving - Part 2/2 ( Part 1/2 ):
Watch on YouTube
7. "osTicket basic installation" page - "System settings" block
- type your system settings
- scroll down

8. "osTicket basic installation" page - "Admin User" block
- type yours osTicket v1.9.14 opensource support ticket system admin credentials
- scroll down

9. "osTicket basic installation" page - "Database settings" block

Now we need to create Database for osTicket v1.9.14 opensource support ticket system
1) Open phpMyAdmin in new browser tab (or window :) ) - http://localhost/phpmyadmin
2) Open SQL tab
3) Execute following query

CREATE DATABASE `osticket`
DEFAULT CHARACTER SET utf8 COLLATE utf8_general_ci;
CREATE USER 'osticket-owner'@'localhost';
CREATE USER 'osticket-owner'@'127.0.0.1';
CREATE USER 'osticket-owner'@'::1';
SET PASSWORD
FOR 'osticket-owner'@'localhost' = PASSWORD('osticket123$%');
SET PASSWORD
FOR 'osticket-owner'@'127.0.0.1' = PASSWORD('osticket123$%');
SET PASSWORD
FOR 'osticket-owner'@'::1' = PASSWORD('osticket123$%');
GRANT ALL PRIVILEGES ON
`osticket`.* TO 'osticket-owner'@'localhost' WITH GRANT OPTION;
GRANT ALL PRIVILEGES ON
`osticket`.* TO 'osticket-owner'@'127.0.0.1' WITH GRANT OPTION;
GRANT ALL PRIVILEGES ON
`osticket`.* TO 'osticket-owner'@'::1' WITH GRANT OPTION;


Go back to osTicket v1.9.14 opensource support ticket system installation page
- type MySQL Hostname - localhost
- type MySQL Database - osticket
- type MySQL User- ostiket-owner
- type MySQL Password - ostiket123$%
- click "Install Now" button

10. Installing ....

11. "Congratulations!" page

12. Goto folder C:\xampp\htdocs\osticket
- delete folder \setup

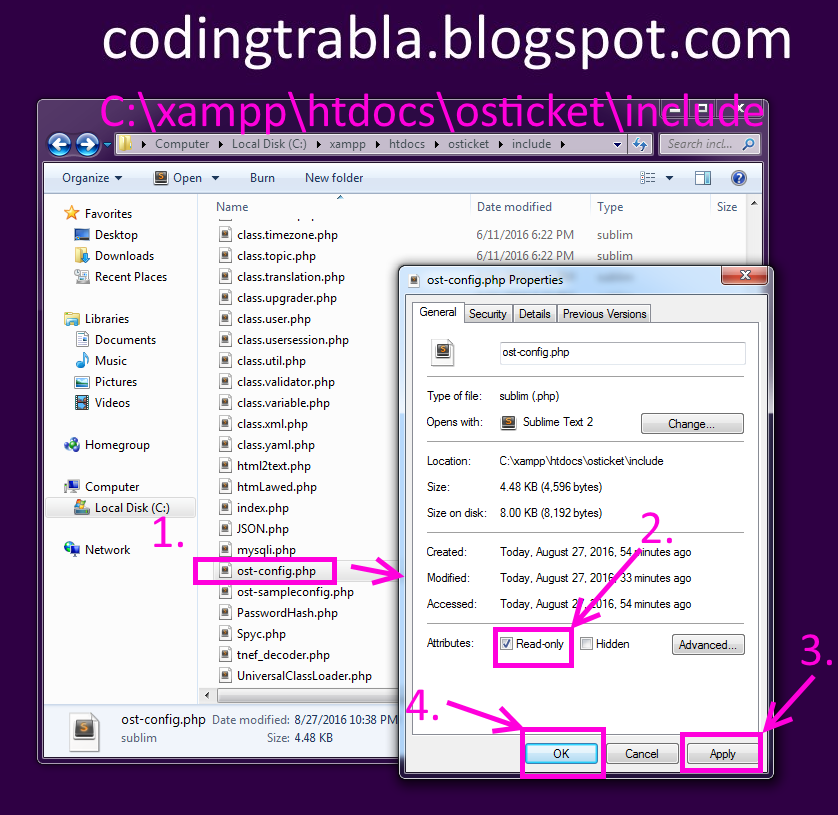
13. Goto folder C:\xampp\htdocs\osticket\include
- right mouse click on file os-config.php
- select "Properties"
- enable checkbox "Read-only"
- click "Apply" button
- click "Ok" button

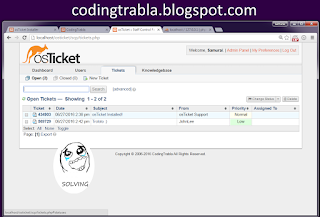
Enjoy osTicket v1.9.14 opensource support ticket system !!!


Admin Panel of osTicket v1.9.14 opensource support ticket system


- type your system settings
- scroll down

8. "osTicket basic installation" page - "Admin User" block
- type yours osTicket v1.9.14 opensource support ticket system admin credentials
- scroll down

9. "osTicket basic installation" page - "Database settings" block

Now we need to create Database for osTicket v1.9.14 opensource support ticket system
1) Open phpMyAdmin in new browser tab (or window :) ) - http://localhost/phpmyadmin
2) Open SQL tab
3) Execute following query

CREATE DATABASE `osticket`
DEFAULT CHARACTER SET utf8 COLLATE utf8_general_ci;
CREATE USER 'osticket-owner'@'localhost';
CREATE USER 'osticket-owner'@'127.0.0.1';
CREATE USER 'osticket-owner'@'::1';
SET PASSWORD
FOR 'osticket-owner'@'localhost' = PASSWORD('osticket123$%');
SET PASSWORD
FOR 'osticket-owner'@'127.0.0.1' = PASSWORD('osticket123$%');
SET PASSWORD
FOR 'osticket-owner'@'::1' = PASSWORD('osticket123$%');
GRANT ALL PRIVILEGES ON
`osticket`.* TO 'osticket-owner'@'localhost' WITH GRANT OPTION;
GRANT ALL PRIVILEGES ON
`osticket`.* TO 'osticket-owner'@'127.0.0.1' WITH GRANT OPTION;
GRANT ALL PRIVILEGES ON
`osticket`.* TO 'osticket-owner'@'::1' WITH GRANT OPTION;


Go back to osTicket v1.9.14 opensource support ticket system installation page
- type MySQL Hostname - localhost
- type MySQL Database - osticket
- type MySQL User- ostiket-owner
- type MySQL Password - ostiket123$%
- click "Install Now" button

10. Installing ....

11. "Congratulations!" page

12. Goto folder C:\xampp\htdocs\osticket
- delete folder \setup

13. Goto folder C:\xampp\htdocs\osticket\include
- right mouse click on file os-config.php
- select "Properties"
- enable checkbox "Read-only"
- click "Apply" button
- click "Ok" button
Enjoy osTicket v1.9.14 opensource support ticket system !!!


Admin Panel of osTicket v1.9.14 opensource support ticket system


No comments:
Post a Comment