Showing posts with label osTicket. Show all posts

osTicket v1.9.14: change logo

Trabla: osTicket v1.9.14: change logo

osTicket v1.9.14 change logo

This tutorial explains how to change logo in osTicket v1.9.14 free open source support ticket system.

By the way detailed tutorial how to install osTicket v1.9.14 on windows localhost:
Part 1https://codingtrabla.blogspot.com/2016/08/install-osticket-v1914-on-windows-part.html
Part 2 https://codingtrabla.blogspot.com/2016/08/install-osticket-v1914-on-windows-part_28.html

Solving:


Watch on YouTube

1. Login to your  osTicket v1.9.14  as administrator

osTicket v1.9.14 change logo tutorial 1


2. Click on "Admin Panel" link in top menu of  osTicket v1.9.14  system

osTicket v1.9.14 change logo tutorial 2


3. On  osTicket v1.9.14  "Admin Panel" page do following steps:

- click on "Settings" tab
- click on "Company" sub-tab

osTicket v1.9.14 change logo tutorial 3

- scroll down

osTicket v1.9.14 change logo tutorial 4

- you should see following controls

osTicket v1.9.14 change logo tutorial 5


4. Now we need to create logo-images
- open your favorite image editor ( Paint.Net is used in this tutorial )
- create two logo-images - one small for staff and bigger for clients
( in this tutorial we use sizes 817x170 and  395x132  - same size as default images )

osTicket v1.9.14 change logo tutorial 6

osTicket v1.9.14 change logo tutorial 7

osTicket v1.9.14 change logo tutorial 8

osTicket v1.9.14 change logo tutorial 9


5. Now return to osTicket v1.9.14 "Settings->Company"  page

- label "Upload new logo" - click button "Choose file"
- select your first logo image
- click "Open"

osTicket v1.9.14 change logo tutorial 10

- click "Save Changes" button

osTicket v1.9.14 change logo tutorial 11


- label "Upload new logo" - click button "Choose file"
- select your second logo image
- click "Open"

osTicket v1.9.14 change logo tutorial 12

- click "Save Changes" button

osTicket v1.9.14 change logo tutorial 13

osTicket v1.9.14 change logo tutorial 14


- for first  image - enable first radio button in row - first column "Client"  
- for second image - enable second radio button in row - second column "Staff"
- click "Save Changes" button

osTicket v1.9.14 change logo tutorial 15

Hooray!!!
Enjoy your new logos in osTicket v1.9.14 free open source support ticket system  !!!

osTicket v1.9.14 change logo tutorial 16

osTicket v1.9.14 change logo tutorial 17

osTicket v1.9.14 change logo tutorial 18

Install osTicket v1.9.14 on windows - Part 2/2

Trabla: Install osTicket v1.9.14 open source support ticket system on Windows ( XAMPP 5.6.23 ) - Part 2/2

Install osTicket v1.9.14 on windows tutorial

osTicket is a widely-used and trusted open source support ticket system, written on PHP. It seamlessly routes inquiries created via email, web-forms and phone calls into a simple, easy-to-use, multi-user, web-based customer support platform. osTicket comes packed with more features and tools than most of the expensive (and complex) support ticket systems on the market. The best part is, it's completely free.


Solving  - Part 2/2  (  Part 1/2 ):


Watch on YouTube

7. "osTicket basic installation" page - "System settings" block

- type your system settings
- scroll down

Install osTicket v1.9.14 on windows tutorial 1

8. "osTicket basic installation" page - "Admin User" block

- type yours  osTicket v1.9.14 opensource support ticket system admin credentials
- scroll down

Install osTicket v1.9.14 on windows tutorial 2


9. "osTicket basic installation" page - "Database settings" block

Install osTicket v1.9.14 on windows tutorial 3

Now we need to create Database for  osTicket v1.9.14 opensource support ticket system

1) Open phpMyAdmin in new browser tab (or window :) ) - http://localhost/phpmyadmin
2) Open SQL tab
3) Execute following query

Install osTicket v1.9.14 on windows tutorial 4


CREATE DATABASE `osticket` 
DEFAULT CHARACTER SET utf8 COLLATE utf8_general_ci;

CREATE USER 'osticket-owner'@'localhost'; 
CREATE USER 'osticket-owner'@'127.0.0.1';
CREATE USER 'osticket-owner'@'::1';

SET PASSWORD 
FOR 'osticket-owner'@'localhost' = PASSWORD('osticket123$%');
SET PASSWORD 
FOR 'osticket-owner'@'127.0.0.1' = PASSWORD('osticket123$%');
SET PASSWORD 
FOR 'osticket-owner'@'::1' = PASSWORD('osticket123$%');


GRANT ALL PRIVILEGES ON 
`osticket`.* TO 'osticket-owner'@'localhost' WITH GRANT OPTION;
GRANT ALL PRIVILEGES ON 
`osticket`.* TO 'osticket-owner'@'127.0.0.1' WITH GRANT OPTION;
GRANT ALL PRIVILEGES ON 
`osticket`.* TO 'osticket-owner'@'::1' WITH GRANT OPTION;

Install osTicket v1.9.14 on windows tutorial 5

Install osTicket v1.9.14 on windows tutorial 6

Go back  to  osTicket v1.9.14 opensource support ticket system  installation page

- type MySQL Hostname -  localhost
- type MySQL Database osticket
- type MySQL User-  ostiket-owner
- type MySQL Password - ostiket123$%

- click "Install Now" button

Install osTicket v1.9.14 on windows tutorial 7


10.  Installing ....

Install osTicket v1.9.14 on windows tutorial 8


11. "Congratulations!" page

Install osTicket v1.9.14 on windows tutorial 9


12.  Goto folder C:\xampp\htdocs\osticket

delete folder \setup

Install osTicket v1.9.14 on windows tutorial 10


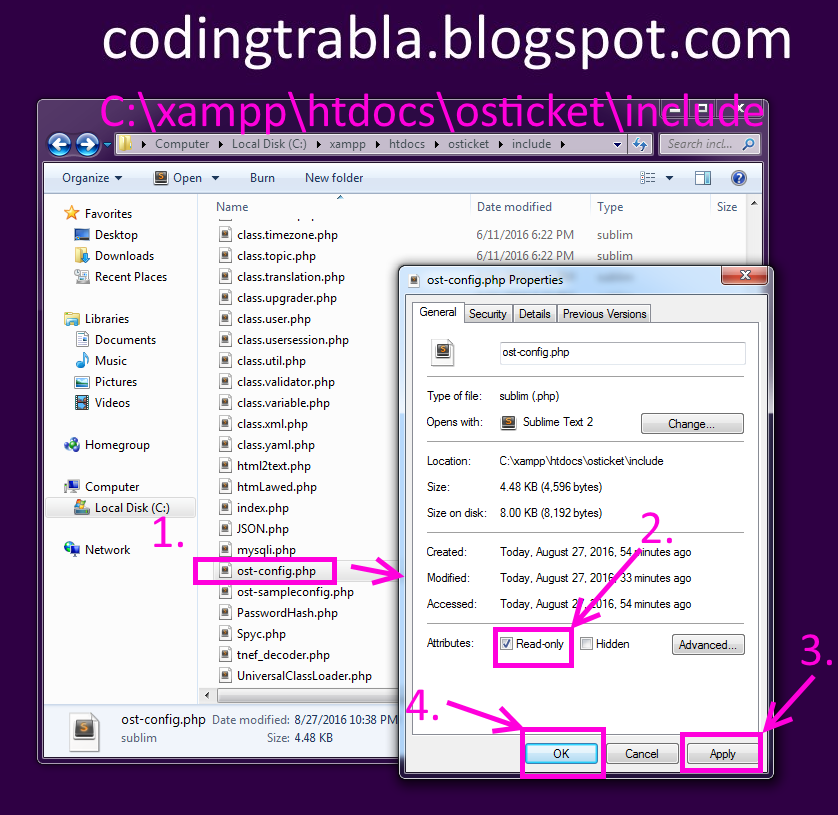
13. Goto folder C:\xampp\htdocs\osticket\include

- right mouse click on file os-config.php
- select "Properties"
- enable checkbox "Read-only"
- click "Apply" button
- click "Ok" button

Install osTicket v1.9.14 on windows tutorial 11

Enjoy  osTicket v1.9.14 opensource support ticket system   !!!

Install osTicket v1.9.14 on windows tutorial 12

Install osTicket v1.9.14 on windows tutorial 13

Install osTicket v1.9.14 on windows tutorial 14


Admin Panel of osTicket v1.9.14 opensource support ticket system

Install osTicket v1.9.14 on windows tutorial 15

Install osTicket v1.9.14 on windows tutorial 16

Install osTicket v1.9.14 on windows tutorial 17

Install osTicket v1.9.14 on windows tutorial 18

Install osTicket v1.9.14 on windows tutorial 19

Install osTicket v1.9.14 on windows tutorial 20

Install osTicket v1.9.14 on windows tutorial 20

Install osTicket v1.9.14 on windows - Part 1/2

Trabla: Install osTicket v1.9.14 open source support ticket system on Windows ( XAMPP 5.6.23 ) - Part 1/2

Install osTicket support ticket v1.9.14 on windows XAMPP tutorial

osTicket is a widely-used and trusted open source support ticket system, written on PHP. It seamlessly routes inquiries created via email, web-forms and phone calls into a simple, easy-to-use, multi-user, web-based customer support platform. osTicket comes packed with more features and tools than most of the expensive (and complex) support ticket systems on the market. The best part is, it's completely free.


Solving  - Part 1/2  ( Part 2/2 ):


Watch on YouTube

1. Download and install XAMPP 5.6.23 from official site:
https://www.apachefriends.org/download.html

Install osTicket support ticket v1.9.14 on windows XAMPP tutorial 1

2. Download osTicket v1.9.14 opensource support ticket system sources from official site:
http://osticket.com/

Install osTicket support ticket v1.9.14 on windows XAMPP tutorial 2

Install osTicket support ticket v1.9.14 on windows XAMPP tutorial 3

Install osTicket support ticket v1.9.14 on windows XAMPP tutorial 4

Install osTicket support ticket v1.9.14 on windows XAMPP tutorial 5


3. Create folder \osticket XAMPP htdocs folder
C:\xampp\htdocs\osticket
and copy all files from downloaded osTicket v1.9.14 opensource support ticket system  .zip source
( copy content from archive folder upload )

Install osTicket support ticket v1.9.14 on windows XAMPP tutorial 6


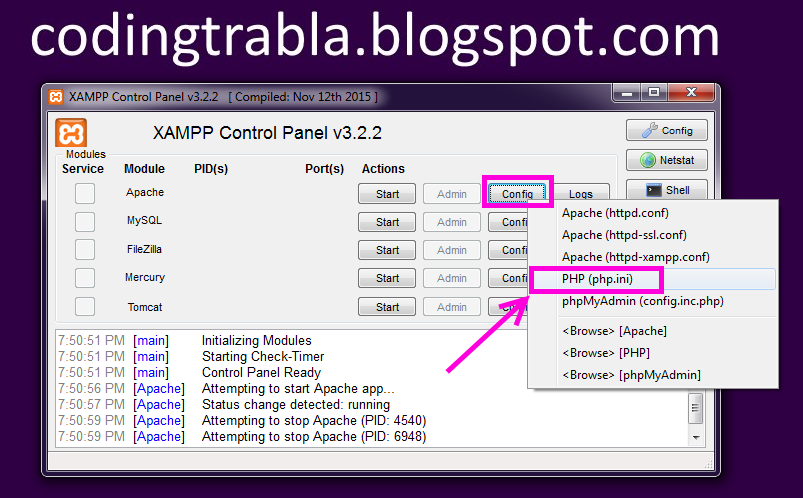
 4. Run XAMPP Control Panel 

open php.ini file ( Apache ->  Config-> PHP(php.ini) )

Install osTicket support ticket v1.9.14 on windows XAMPP tutorial 7

- change max_execution_time value
from max_execution_time=30 to max_execution_time=600

Install osTicket support ticket v1.9.14 on windows XAMPP tutorial 8

- uncomment ( remove semicolon ) imap extension
from ;extension=php_imap.dll  to extension=php_imap.dll


Install osTicket support ticket v1.9.14 on windows XAMPP tutorial 9

Install osTicket support ticket v1.9.14 on windows XAMPP tutorial 10

- save  & close php.ini
- start Apache
- start Database

Install osTicket support ticket v1.9.14 on windows XAMPP tutorial 11


5. Open in browser following url to start  osTicket v1.9.14 opensource support ticket system  web installation
http://localhost/osticket

"Prerequisites" page

- make sure all ok
- click "Continue" button

Install osTicket support ticket v1.9.14 on windows XAMPP tutorial 12

6. "Missing configuration file" page

Install osTicket support ticket v1.9.14 on windows XAMPP tutorial 13

- open folder "C:\xampp\htdocs\osticket\include\"
- find file "os-sampleconfig.php"
- copy and paste file "os-sampleconfig.php"

Install osTicket support ticket v1.9.14 on windows XAMPP tutorial 14

- rename "os-sampleconfig Copy.php" to "os-config.php"

Install osTicket support ticket v1.9.14 on windows XAMPP tutorial 15

- go back to web-browser "Missing configuration file" page - click "Continue" button


Install osTicket support ticket v1.9.14 on windows XAMPP tutorial 16


Next - Part 2/2