Showing posts with label NetBeans. Show all posts

NetBeans IDE with Selenium and Chrome Driver - installation and setup

Trabla: NetBeans IDE with Selenium and Chrome Driver - installation and setup ( QA / Software Testing Automation )

NetBeans IDE with Selenium and Chrome Driver - installation and setup

NetBeans is an integrated development environment (IDE) for Java. NetBeans allows applications to be developed from a set of modular software components called modules. NetBeans runs on Microsoft Windows, macOS, Linux and Solaris. In addition to Java development, it has extensions for other languages like PHP, C, C++ and HTML5., Javadoc and Javascript. Applications based on NetBeans, including the NetBeans IDE, can be extended by third party developers

Selenium is a portable software-testing framework for web applications. Selenium provides a playback (formerly also recording) tool for authoring tests without the need to learn a test scripting language (Selenium IDE). It also provides a test domain-specific language (Selenese) to write tests in a number of popular programming languages, including C#, Groovy, Java, Perl, PHP, Python, Ruby and Scala. The tests can then run against most modern web browsers. Selenium deploys on Windows, Linux, and macOS platforms. It is open-source software, released under the Apache 2.0 license


Solving:


1. Download and install latest Java Development Kit ( JDK )


- goto Oracle Java Development Kit ( JDK ) official site :
http://www.oracle.com/technetwork/java/javase/downloads/jdk8-downloads-2133151.html

NetBeans IDE with Selenium and Chrome Driver - installation and setup tutorial 1

- download and install latest Java Development Kit ( JDK )

NetBeans IDE with Selenium and Chrome Driver - installation and setup tutorial 2

2. Download and install NetBeans IDE from official site

- goto NetBeans IDE official site in browser : https://netbeans.org/downloads/

NetBeans IDE with Selenium and Chrome Driver - installation and setup tutorial 3

- select NetBean version, we will use Java SE version, and click Download button

NetBeans IDE with Selenium and Chrome Driver - installation and setup tutorial 4


- install NetBeans IDE to your computer

3. Download Selenium standalone server from official site 

- goto official Selenium site : https://www.seleniumhq.org/download/

NetBeans IDE with Selenium and Chrome Driver - installation and setup tutorial 5

- find paragraph "Selenium Standalone Server"

NetBeans IDE with Selenium and Chrome Driver - installation and setup tutorial 6

- find Download version 3.10.0 and click on link

NetBeans IDE with Selenium and Chrome Driver - installation and setup tutorial 7

NetBeans IDE with Selenium and Chrome Driver - installation and setup tutorial 8


4. Download Chromer Driver ( browser automation ) for Selenium

- goto official Selenium site : https://www.seleniumhq.org/download/

- find header "Third Party Browser Drivers NOT DEVELOPED by seleniumhq"
and click on "Google Chrome Driver"

NetBeans IDE with Selenium and Chrome Driver - installation and setup tutorial 9

- in newly opened web-site of Chrome WebDriver site
click on ChromeDriver 2.35 link

NetBeans IDE with Selenium and Chrome Driver - installation and setup tutorial 10

- in new page of Chrome WebDriver site
click on ChromeDriver 2.35 link

NetBeans IDE with Selenium and Chrome Driver - installation and setup tutorial 11

- click on "chromedriver_win32.zip" link to start download Chrome Driver for Windows

NetBeans IDE with Selenium and Chrome Driver - installation and setup tutorial 12

NetBeans IDE with Selenium and Chrome Driver - installation and setup tutorial 13


NetBeans IDE with Selenium and Chrome Driver - installation and setup tutorial 14

- unzip chromerdriver_win32.zip

NetBeans IDE with Selenium and Chrome Driver - installation and setup tutorial 15

- create folder C:\selenium_browser_drivers and copy chromedriver.exe to folder

NetBeans IDE with Selenium and Chrome Driver - installation and setup tutorial 16

NetBeans IDE with Selenium and Chrome Driver - installation and setup tutorial 17


5. Run NetBeans IDE

NetBeans IDE with Selenium and Chrome Driver - installation and setup tutorial 18

NetBeans IDE with Selenium and Chrome Driver - installation and setup tutorial 19

6. Create new Java project in NetBeans IDE

- in NetBeans menu click "File", than click "New Project..."

NetBeans IDE with Selenium and Chrome Driver - installation and setup tutorial 20

- in NetBeans "New Project..." dialog 
1)  select category "Java"
2) select "Java Application"
3) click "Next >" button

NetBeans IDE with Selenium and Chrome Driver - installation and setup tutorial 21

- in NetBeans "New Java Application" dialog
1) type project name "SeleniumChrome"
2) click "Finish" button

NetBeans IDE with Selenium and Chrome Driver - installation and setup tutorial 22

NetBeans IDE with Selenium and Chrome Driver - installation and setup tutorial 23


7. Import selenium-standalone jar into Netbeans IDE project

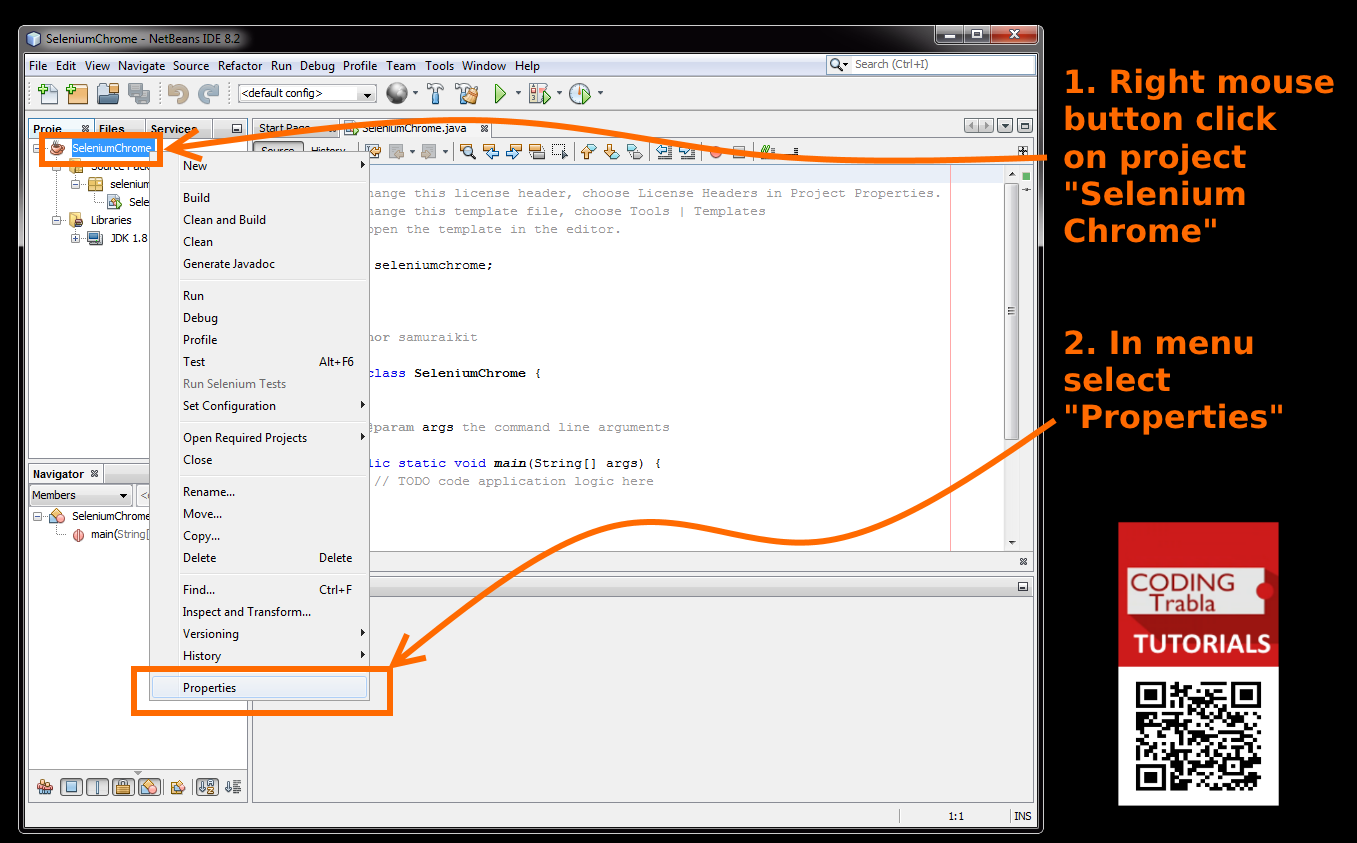
- right mouse click on "SeleniumChrome" in Project Tree
- in menu select "Properties"

NetBeans IDE with Selenium and Chrome Driver - installation and setup tutorial 24

- in NetBeans "Project Properties" dialog :
1) select Category "Libraries"
2) click "Add JAR/Folder" button

NetBeans IDE with Selenium and Chrome Driver - installation and setup tutorial 25


- in NetBeans "Add JAR/Folder" dialog :
1) find and select selenium-server-standalone-3.10.0.jar 
2) click "Open" button

NetBeans IDE with Selenium and Chrome Driver - installation and setup tutorial 26

- in NetBeans "Project Properties" dialog  - click "Ok" button

NetBeans IDE with Selenium and Chrome Driver - installation and setup tutorial 27

NetBeans IDE with Selenium and Chrome Driver - installation and setup tutorial 28


8. Copy and paste following Java code for Selenium simple test into Netbeans IDE

/*
 * To change this license header, choose License Headers in Project Properties.
 * To change this template file, choose Tools | Templates
 * and open the template in the editor.
 */
package seleniumchrome;


import org.openqa.selenium.chrome.ChromeDriver;


import org.openqa.selenium.By;
import org.openqa.selenium.WebDriver;
import org.openqa.selenium.WebElement;
import org.openqa.selenium.support.ui.ExpectedCondition;
import org.openqa.selenium.support.ui.WebDriverWait;

/**
 *
 * @author your_name :)
 */
public class SeleniumChrome {

    /**
     * @param args the command line arguments
     */
    public static void main(String[] args) {
        // TODO code application logic here
     
        System.setProperty(
                "webdriver.chrome.driver",
                "/selenium_browser_drivers/chromedriver.exe"
// C:\selenium_browser_drivers\chromedriver.exe
        );
     
        // Create a new instance of the Chrome driver
     
        WebDriver driver = new ChromeDriver();

        // And now use this to visit Google
        driver.get("http://www.google.com");
        // Alternatively the same thing can be done like this
        // driver.navigate().to("http://www.google.com");

        // Find the text input element by its name
        WebElement element = driver.findElement(By.name("q"));

        // Enter something to search for
        element.sendKeys("Cheese!");

        // Now submit the form. WebDriver will find the form for us from the element
        element.submit();

        // Check the title of the page
        System.out.println("Page title is: " + driver.getTitle());
     
        // Google's search is rendered dynamically with JavaScript.
        // Wait for the page to load, timeout after 10 seconds
        (new WebDriverWait(driver, 10)).until(new ExpectedCondition<Boolean>() {
            public Boolean apply(WebDriver d) {
                return d.getTitle().toLowerCase().startsWith("cheese!");
            }
        });

        // Should see: "cheese! - Google Search"
        System.out.println("Page title is: " + driver.getTitle());


        //Close the browser
        driver.quit();
     
    }
 
} // code end :)

9. Run Selenium project in NetBeans IDE

NetBeans IDE with Selenium and Chrome Driver - installation and setup tutorial 29


Hooray !!! Enjoy NetBeans IDE with Selenium and Chrome Driver

Install Netbeans 8.2 (2017) on Windows 7 - free opensource Java EE IDE

Trabla: Install Netbeans 8.2 (2017) on Windows 7 - free opensource Java EE IDE

Install Netbeans 8.2 (2017) on Windows 7 - free opensource Java EE IDE

NetBeans is a software development platform written in Java. The NetBeans Platform allows applications to be developed from a set of modular software components called modules. Applications based on the NetBeans Platform, including the NetBeans integrated development environment (IDE), can be extended by third party developers.
The NetBeans IDE is primarily intended for development in Java, but also supports other languages, in particular PHP, C/C++ and HTML5.
NetBeans is cross-platform and runs on Microsoft Windows, Mac OS X, Linux, Solaris and other platforms supporting a compatible JVM.
The editor supports many languages from Java, C/C++, XML and HTML, to PHP, Groovy, Javadoc, JavaScript and JSP. Because the editor is extensible, you can plug in support for many other languages.
The NetBeans Team actively supports the product and seeks feature suggestions from the wider community. Every release is preceded by a time for Community testing and feedback. Over 18 million downloads of the NetBeans IDE to date, and over 800,000 participating developers, the NetBeans project is thriving and continues to grow.
A new version was released 8.2/october 3,2016.NetBeans IDE is the official IDE for Java 8. With its editors, code analyzers, and converters, you can quickly and smoothly upgrade your applications to use new Java 8 language constructs, such as lambdas, functional operations, and method references.

NetBeans IDE Official Site - https://netbeans.org/

Solving


NetBeans IDE: You don't have permission to install plugin Module Build Harness into the installation directory.

Trabla: NetBeans IDE : You don't have permission to install plugin Module Build Harness into the installation directory.


Howto fix NetBeans IDE: You don't have permission to install plugin Module Build Harness into the installation directory - tutorial 1

Solving:
1. Close IDE
2. Run IDE as Administrator ( right mouse click on IDE shortcut - select  "Run as administrator")
Howto fix NetBeans IDE: You don't have permission to install plugin Module Build Harness into the installation directory - tutorial 2


3. Install updates