Showing posts with label selenium. Show all posts

NetBeans IDE with Selenium and Chrome Driver - installation and setup

Trabla: NetBeans IDE with Selenium and Chrome Driver - installation and setup ( QA / Software Testing Automation )

NetBeans IDE with Selenium and Chrome Driver - installation and setup

NetBeans is an integrated development environment (IDE) for Java. NetBeans allows applications to be developed from a set of modular software components called modules. NetBeans runs on Microsoft Windows, macOS, Linux and Solaris. In addition to Java development, it has extensions for other languages like PHP, C, C++ and HTML5., Javadoc and Javascript. Applications based on NetBeans, including the NetBeans IDE, can be extended by third party developers

Selenium is a portable software-testing framework for web applications. Selenium provides a playback (formerly also recording) tool for authoring tests without the need to learn a test scripting language (Selenium IDE). It also provides a test domain-specific language (Selenese) to write tests in a number of popular programming languages, including C#, Groovy, Java, Perl, PHP, Python, Ruby and Scala. The tests can then run against most modern web browsers. Selenium deploys on Windows, Linux, and macOS platforms. It is open-source software, released under the Apache 2.0 license


Solving:


1. Download and install latest Java Development Kit ( JDK )


- goto Oracle Java Development Kit ( JDK ) official site :
http://www.oracle.com/technetwork/java/javase/downloads/jdk8-downloads-2133151.html

NetBeans IDE with Selenium and Chrome Driver - installation and setup tutorial 1

- download and install latest Java Development Kit ( JDK )

NetBeans IDE with Selenium and Chrome Driver - installation and setup tutorial 2

2. Download and install NetBeans IDE from official site

- goto NetBeans IDE official site in browser : https://netbeans.org/downloads/

NetBeans IDE with Selenium and Chrome Driver - installation and setup tutorial 3

- select NetBean version, we will use Java SE version, and click Download button

NetBeans IDE with Selenium and Chrome Driver - installation and setup tutorial 4


- install NetBeans IDE to your computer

3. Download Selenium standalone server from official site 

- goto official Selenium site : https://www.seleniumhq.org/download/

NetBeans IDE with Selenium and Chrome Driver - installation and setup tutorial 5

- find paragraph "Selenium Standalone Server"

NetBeans IDE with Selenium and Chrome Driver - installation and setup tutorial 6

- find Download version 3.10.0 and click on link

NetBeans IDE with Selenium and Chrome Driver - installation and setup tutorial 7

NetBeans IDE with Selenium and Chrome Driver - installation and setup tutorial 8


4. Download Chromer Driver ( browser automation ) for Selenium

- goto official Selenium site : https://www.seleniumhq.org/download/

- find header "Third Party Browser Drivers NOT DEVELOPED by seleniumhq"
and click on "Google Chrome Driver"

NetBeans IDE with Selenium and Chrome Driver - installation and setup tutorial 9

- in newly opened web-site of Chrome WebDriver site
click on ChromeDriver 2.35 link

NetBeans IDE with Selenium and Chrome Driver - installation and setup tutorial 10

- in new page of Chrome WebDriver site
click on ChromeDriver 2.35 link

NetBeans IDE with Selenium and Chrome Driver - installation and setup tutorial 11

- click on "chromedriver_win32.zip" link to start download Chrome Driver for Windows

NetBeans IDE with Selenium and Chrome Driver - installation and setup tutorial 12

NetBeans IDE with Selenium and Chrome Driver - installation and setup tutorial 13


NetBeans IDE with Selenium and Chrome Driver - installation and setup tutorial 14

- unzip chromerdriver_win32.zip

NetBeans IDE with Selenium and Chrome Driver - installation and setup tutorial 15

- create folder C:\selenium_browser_drivers and copy chromedriver.exe to folder

NetBeans IDE with Selenium and Chrome Driver - installation and setup tutorial 16

NetBeans IDE with Selenium and Chrome Driver - installation and setup tutorial 17


5. Run NetBeans IDE

NetBeans IDE with Selenium and Chrome Driver - installation and setup tutorial 18

NetBeans IDE with Selenium and Chrome Driver - installation and setup tutorial 19

6. Create new Java project in NetBeans IDE

- in NetBeans menu click "File", than click "New Project..."

NetBeans IDE with Selenium and Chrome Driver - installation and setup tutorial 20

- in NetBeans "New Project..." dialog 
1)  select category "Java"
2) select "Java Application"
3) click "Next >" button

NetBeans IDE with Selenium and Chrome Driver - installation and setup tutorial 21

- in NetBeans "New Java Application" dialog
1) type project name "SeleniumChrome"
2) click "Finish" button

NetBeans IDE with Selenium and Chrome Driver - installation and setup tutorial 22

NetBeans IDE with Selenium and Chrome Driver - installation and setup tutorial 23


7. Import selenium-standalone jar into Netbeans IDE project

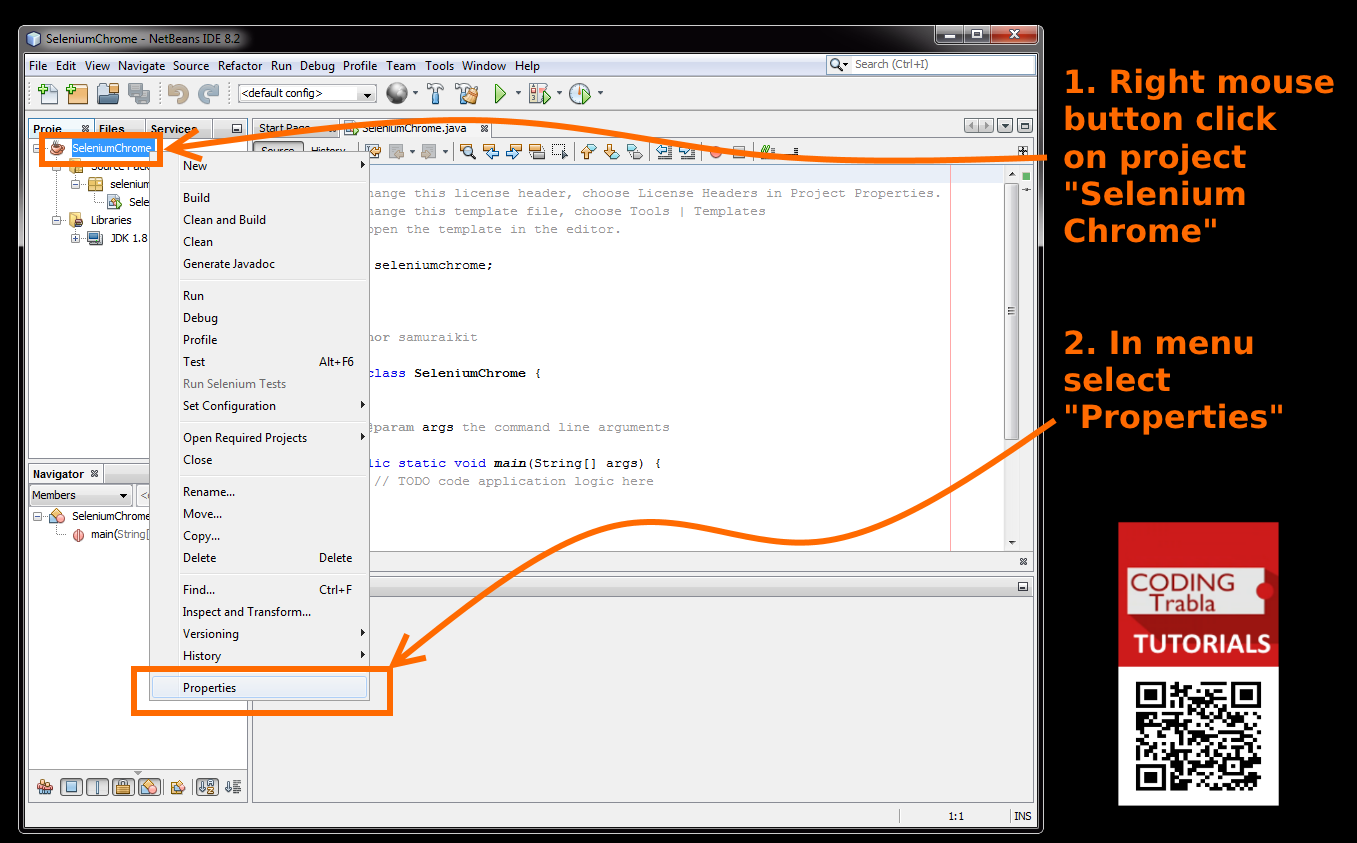
- right mouse click on "SeleniumChrome" in Project Tree
- in menu select "Properties"

NetBeans IDE with Selenium and Chrome Driver - installation and setup tutorial 24

- in NetBeans "Project Properties" dialog :
1) select Category "Libraries"
2) click "Add JAR/Folder" button

NetBeans IDE with Selenium and Chrome Driver - installation and setup tutorial 25


- in NetBeans "Add JAR/Folder" dialog :
1) find and select selenium-server-standalone-3.10.0.jar 
2) click "Open" button

NetBeans IDE with Selenium and Chrome Driver - installation and setup tutorial 26

- in NetBeans "Project Properties" dialog  - click "Ok" button

NetBeans IDE with Selenium and Chrome Driver - installation and setup tutorial 27

NetBeans IDE with Selenium and Chrome Driver - installation and setup tutorial 28


8. Copy and paste following Java code for Selenium simple test into Netbeans IDE

/*
 * To change this license header, choose License Headers in Project Properties.
 * To change this template file, choose Tools | Templates
 * and open the template in the editor.
 */
package seleniumchrome;


import org.openqa.selenium.chrome.ChromeDriver;


import org.openqa.selenium.By;
import org.openqa.selenium.WebDriver;
import org.openqa.selenium.WebElement;
import org.openqa.selenium.support.ui.ExpectedCondition;
import org.openqa.selenium.support.ui.WebDriverWait;

/**
 *
 * @author your_name :)
 */
public class SeleniumChrome {

    /**
     * @param args the command line arguments
     */
    public static void main(String[] args) {
        // TODO code application logic here
     
        System.setProperty(
                "webdriver.chrome.driver",
                "/selenium_browser_drivers/chromedriver.exe"
// C:\selenium_browser_drivers\chromedriver.exe
        );
     
        // Create a new instance of the Chrome driver
     
        WebDriver driver = new ChromeDriver();

        // And now use this to visit Google
        driver.get("http://www.google.com");
        // Alternatively the same thing can be done like this
        // driver.navigate().to("http://www.google.com");

        // Find the text input element by its name
        WebElement element = driver.findElement(By.name("q"));

        // Enter something to search for
        element.sendKeys("Cheese!");

        // Now submit the form. WebDriver will find the form for us from the element
        element.submit();

        // Check the title of the page
        System.out.println("Page title is: " + driver.getTitle());
     
        // Google's search is rendered dynamically with JavaScript.
        // Wait for the page to load, timeout after 10 seconds
        (new WebDriverWait(driver, 10)).until(new ExpectedCondition<Boolean>() {
            public Boolean apply(WebDriver d) {
                return d.getTitle().toLowerCase().startsWith("cheese!");
            }
        });

        // Should see: "cheese! - Google Search"
        System.out.println("Page title is: " + driver.getTitle());


        //Close the browser
        driver.quit();
     
    }
 
} // code end :)

9. Run Selenium project in NetBeans IDE

NetBeans IDE with Selenium and Chrome Driver - installation and setup tutorial 29


Hooray !!! Enjoy NetBeans IDE with Selenium and Chrome Driver

How TO FIX WebDriverException Failed to connect to binary FirefoxBinary in Selenium Tests

Trabla: How TO FIX WebDriverException Failed to connect to binary FirefoxBinary in Selenium Tests


How TO FIX WebDriverException Failed to connect to binary FirefoxBinary in Selenium Tests

Solving:


How to download previous version of Selenium WebDriver

Trabla: How to download previous version of Selenium WebDriver


How to download previous version of Selenium WebDriver


Solving:


How to setup FireFox driver for Selenium 3.0 with Eclipse NEON 2.0

Trabla: How to setup FireFox driver for Selenium 3.0 with Eclipse NEON 2.0


How to setup FireFox driver for Selenium 3.0 with Eclipse NEON 2.0


Solving:


Source code  used in tutorial:


package Pack;


import org.junit.Test;
import org.openqa.selenium.WebDriver;
import org.openqa.selenium.firefox.FirefoxDriver;
import org.openqa.selenium.remote.DesiredCapabilities;

public class settingUp {


public static void main(String[] args) {
// TODO Auto-generated method stub


}
@Test
  public void drivers () {

System.setProperty("webdriver.gecko.driver","D:\\Selenium\\geckodriver-v0.14.0-win64 (1)\\geckodriver.exe");
   DesiredCapabilities capabilities=DesiredCapabilities.firefox();
   capabilities.setCapability("marionette", true);
   WebDriver driver = new FirefoxDriver(capabilities);
   driver.get("https://google.com/");

  }
}


How to remove ( uninstall ) Selenium IDE from Firefox

Trabla: How to remove ( uninstall ) Selenium IDE from Firefox


How to remove ( uninstall ) Selenium IDE from Firefox


Solving:


How to export Selenium IDE test cases to Eclipse ( Windows 10 )

Trabla: How to export Selenium IDE test cases to Eclipse ( Windows 10 )

How to export Selenium IDE test cases to Eclipse ( Windows 10 )


Solving:


How to download and install Selenium IDE

Trabla: How to download and install Selenium IDE on Windows 10


How to download and install Selenium IDE

Solving:


Install Selenium server 3.0.1 + Chrome WebDriver + Eclipse Neon.1 + JDK 8u111 on Windows 7

Trabla: Install Selenium server 3.0.1 + Chrome WebDriver + Eclipse Neon.1 + JDK 8u111  on Windows 7


Install Selenium server 3.0.1 + Chrome WebDriver + Eclipse Neon.1 + JDK 8u111  on Windows 7


Solving:


Watch on YouTube


1. Download links used in tutorial:
1. Selenium - http://www.seleniumhq.org/
2. Chrome WebDriver - http://chromedriver.storage.googleapis.com/index.html?path=2.25/
3. Eclipse - https://www.eclipse.org/downloads
4. JDK - http://www.oracle.com/technetwork/java/javase/downloads/jdk8-downloads-2133151.html

2. Source programming code used in tutorial:

import org.openqa.selenium.WebDriver;
import org.openqa.selenium.chrome.ChromeDriver;
import org.openqa.selenium.chrome.ChromeOptions;
import org.openqa.selenium.remote.DesiredCapabilities;


public class ChromeDriverTest {

    public static WebDriver getChromeWebDriver(){


        System.setProperty(
                "webdriver.chrome.driver", 
                // C:\selenium\driver\chromedriver.exe
                "/selenium/driver/chromedriver.exe"
        );
        
        ChromeOptions options = new ChromeOptions();
        options.addArguments("window-size=1024,768");
        DesiredCapabilities capabilities = DesiredCapabilities.chrome();
        capabilities.setCapability(ChromeOptions.CAPABILITY, options);
        
        WebDriver driver = new ChromeDriver(capabilities);
        
        return driver;
    }
    
    
    public static void main(String[] args) {  
    
        
        WebDriver chrome = ChromeDriverTest.getChromeWebDriver();
        
        
        String url = "https://google.com";
        
        chrome.get(url); 
        
        System.out.println("Page title is: " + chrome.getTitle());
        
    }
    
    
}

Java & Selenium: get parent HTML WebElement (tag) from current (child)

Trabla: Java & Selenium: get parent HTML WebElement (tag) from current (child)

Solving:

Use   xpath - "parent::*"

Example 1:

WebElement lvChildElement    = driver.findElement( By.id("id123") );

WebElement lvParentElement  =  lvChildElement.findElement( By.xpath("parent::*") );   

Example 2:

HTML

<div>
    <a href="http://mysite.com/post-1" > 
          <img width="100" height="200" 
              src="http://mysite.com/images/1.jpeg" 
              class="image-100x200" >
    </a>
</div>
<div>
    <a href="http://mysite.com/post-2" > 
          <img width="100" height="200" 
              src="http://mysite.com/images/2.jpeg" 
              class="image-100x200" >
    </a>
</div>

List<WebElement> lvImages = driver.findElements(By.className("image-100x200") );

for ( WebElement lvImage: lvImages ) 
{
       WebElement lvParentElement = lvImage.findElement(By.xpath("parent::*"));
 
        System.out.println( "URL : " + lvParentElement.getAttribute("href") );
}

-----------
output:
-----------
URL : http://mysite.com/post-1
URL : http://mysite.com/post-2

Selenium: WebDriver check if element is displayed on screen

Trabla: Selenium: WebDriver check if element is displayed on screen

Solving: 

 if ( driver.findElement( By.className("waiting_dialog") ).isDisplayed() == true  ){

     // Hooray !!! Element is dispayed

 }else{
   
    // Oops, Element is NOT  dispayed
}

Selenium: WebDriver check if element exists

Trabla: Selenium: WebDriver check if element exists

Solving: 

if ( !driver.findElements( By.className("myclass")).isEmpty()  ){

     //DO SOME STAFF WITH ELEMENT

}else{ 

    //DO SOMETHING ELSE,  ELEMENT NOT FOUND

}

Stackoverflow disscussion:
http://stackoverflow.com/questions/6521270/webdriver-check-if-an-element-exists

Selenium + Java + Chrome Driver ( WebDriver ) : quick setup

Trabla: Selenium + Java + Chrome Driver ( WebDriver ) : quick setup


Solving: 

OS: Windows

ChromeDriver is a separate executable that WebDriver uses to control Chrome.
This tutorial shows how to quickly set up selenium environment to use ChromeDriver.

1. Install Java Development Kit ( JDK )

2. Install Eclipse

3. Run Eclipse and create new Java Project, name it "ChromeDriverQuickStart"


Howto setup Selenium + Java + Chrome Driver ( WebDriver ) : quick setup - codingtrabla tutorial 1

Howto setup Selenium + Java + Chrome Driver ( WebDriver ) : quick setup - codingtrabla tutorial 2

Howto setup Selenium + Java + Chrome Driver ( WebDriver ) : quick setup - codingtrabla tutorial 3


4. Download selenium  standalone .jar file
- page - http://www.seleniumhq.org/download/

Howto setup Selenium + Java + Chrome Driver ( WebDriver ) : quick setup - codingtrabla tutorial 4


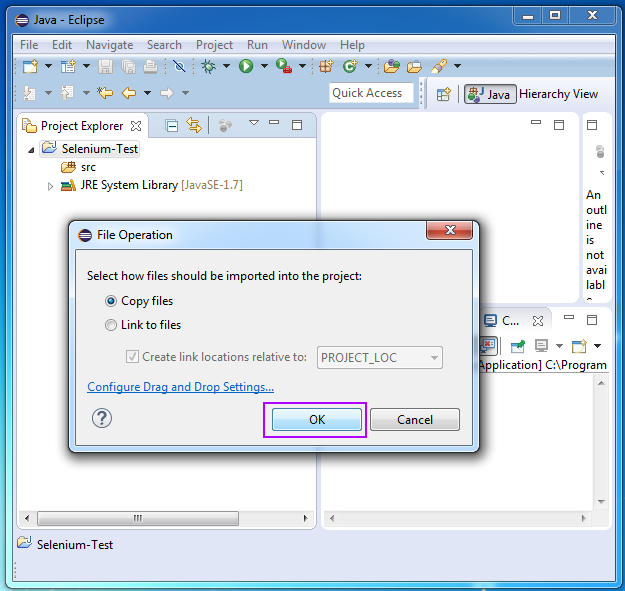
5. Drag and drop  selenium-server-standalone-2.47.1.jar  into eclipse project "src" folder

Howto setup Selenium + Java + Chrome Driver ( WebDriver ) : quick setup - codingtrabla tutorial 5


6. Add selenium-server-standalone-2.47.1.jar into build path

Howto setup Selenium + Java + Chrome Driver ( WebDriver ) : quick setup - codingtrabla tutorial 6
Howto setup Selenium + Java + Chrome Driver ( WebDriver ) : quick setup - codingtrabla tutorial 7

Howto setup Selenium + Java + Chrome Driver ( WebDriver ) : quick setup - codingtrabla tutorial 8


7.  Download chromedriver from
http://chromedriver.storage.googleapis.com/index.html?path=2.18/
and unzip file.
Copy full path to file  chromedriver.exe  after unzipping ( will need in step 8 )
e.g. on my PC :

C:\Users\SamuraiKit\Downloads\chromedriver_win32\chromedriver.exe

Howto setup Selenium + Java + Chrome Driver ( WebDriver ) : quick setup - codingtrabla tutorial 9


8. Create new class "ChromeDriverTest" and copy following code

import org.openqa.selenium.WebDriver;
import org.openqa.selenium.chrome.ChromeDriver;
import org.openqa.selenium.chrome.ChromeOptions;
import org.openqa.selenium.remote.DesiredCapabilities;


public class ChromeDriverTest {

    public static WebDriver getChromeWebDriver(){


         // Path to chromedriver.exe:
         // C:\Users\SamuraiKit\Downloads\chromedriver_win32\chromedriver.exe             
         // Replace to yours
        System.setProperty(
                "webdriver.chrome.driver",
                "/Users/SamuraiKit/Downloads/chromedriver_win32/chromedriver.exe"
        );
       
        ChromeOptions options = new ChromeOptions();
        options.addArguments("window-size=1024,768");
        DesiredCapabilities capabilities = DesiredCapabilities.chrome();
        capabilities.setCapability(ChromeOptions.CAPABILITY, options);
       
        WebDriver driver = new ChromeDriver(capabilities);
       
        return driver;
    }
   
   
    public static void main(String[] args) { 
   
       
        WebDriver chrome = ChromeDriverTest.getChromeWebDriver();
       
       
        String url = "https://google.com";
       
        chrome.get(url);
       
        System.out.println("Page title is: " + chrome.getTitle());
       
    }
   
   
}


9. Run

Selenium & java: execution time delay ( command to wait )

Trabla: Selenium & java: execution time delay  ( command to wait  )

Solving:

Use  Thread.sleep


Example:

public class Example{

    public static void main(String[] args) throws Exception {
   
           WebDriver driver = new FirefoxDriver();
           
           driver.get("http://www.google.com");

           try { 
                 Thread.sleep( 7000 );  // Wait for 7 seconds
           } catch (InterruptedException e) { 
                e.printStackTrace(); 
           }

           driver.quit();

   }

}

Selenium & eclipse : quick start

Trabla: Selenium & eclipse : quick start


selenium browser automation framework


Solving:


1. Download Eclipse IDE for Java Developers
https://www.eclipse.org/downloads/packages/eclipse-ide-java-developers/lunasr1

2. Dowload selenium-server-standalone .jar

version 2.39.0: 
https://code.google.com/p/selenium/downloads/detail?name=selenium-server-standalone-2.39.0.jar

version 2.40.0 ( source https://www.facebook.com/WebDriver/posts/472939509473965  )
http://selenium-release.storage.googleapis.com/2.40/selenium-server-standalone-2.40.0.jar

3. Run eclipse, create new project "Selenium-Test"

Howto setup Selenium browser automation framework in Exclipse IDE on Windows 7 - codingtrabla tutorial 1


Howto setup Selenium browser automation framework in Exclipse IDE on Windows 7 - codingtrabla tutorial 2


4. Drag-and-drop selenium-standalone jar into project 'src' folder

Howto setup Selenium browser automation framework in Exclipse IDE on Windows 7 - codingtrabla tutorial 3


Howto setup Selenium browser automation framework in Exclipse IDE on Windows 7 - codingtrabla tutorial 4


5. Add selenium-standalone jar to build path

Howto setup Selenium browser automation framework in Exclipse IDE on Windows 7 - codingtrabla tutorial 5


Howto setup Selenium browser automation framework in Exclipse IDE on Windows 7 - codingtrabla tutorial 6


6. Create new class "Example" in "src" folder
and copy example from Selenium Getting Started Guide
https://code.google.com/p/selenium/wiki/GettingStarted


Howto setup Selenium browser automation framework in Exclipse IDE on Windows 7 - codingtrabla tutorial 7


Howto setup Selenium browser automation framework in Exclipse IDE on Windows 7 - codingtrabla tutorial 8


Howto setup Selenium browser automation framework in Exclipse IDE on Windows 7 - codingtrabla tutorial 9


7. Run project