Showing posts with label Blender. Show all posts

How to install and config Screencast Keys 3.11 addon in Blender 3.6.1 on Windows 10

 How to install and config Screencast Keys 3.11 addon 

in Blender 3.6.1 on Windows 10


Tutorial howto install screencast key 3.11 addon in blender 3.6.1 on windows 10


Screencast Keys is a blender add-on to display the Keyboard/Mouse and Operation status. Screencast Keys supports English only. The features of this add-on are as follows : 

  1. Display Keyboard/Mouse status 
  2. Display Operation executed last time 
  3. Change area/region/window to display status 
  4. Customize UIs
In this tutorial we will setup Screencast Keys ( version 3.11 ) in Blender 3.6.1 on Windows 10 operation system. So let's do it :) 

Steps :


1. Open blender and check Blender app version ( 3.6.1 )


Open blender and check Blender app version


2. Check if "System : Screencast Keys" add-on exists 

- click on "Edit" menu ( top left corner  of  Blender window )

Click on Edit menu in Blender

- click on "Preferences" sub-menu - "Blender Preferences" windows will be opened 

click on Preferences


windows Blender preferences


- click on "Add-ons" in left menu list 

click on add-ons


- in search field type Screencast Keys - in my case no plugin, so I need to install it :|

type in search Screencast Keys

not found add-on

3. Download Screencast Keys add-on 

- goto github repo of add-on : https://github.com/nutti/Screencast-Keys 

goto github repo of add-on


- scroll down to Download / installation section 

scroll down to Download installation section


- click on "the add-on-version" url 

https://github.com/nutti/Screencast-Keys/blob/master/docs/installation.md#support-version 

click on "the add-on-version" url


- as we see 3.11 version of addon is suitable for blender 2.80 - latest 

3.11 version of addon is suitable for blender 2.80


- scroll down and click on add-on version 3.11 download link : 

https://github.com/nutti/Screencast-Keys/releases/tag/v3.11 

scroll down and click on add-on version 3.11 download link


- click on screencast_keys.zip download url : 

https://github.com/nutti/Screencast-Keys/releases/download/v3.11/screencast_keys.zip 

click on screencast_keys.zip download url


- in result you will get following archive in Downloads folder

blender add-on archive in Downloads folder

4. Install Screencast Keys add-on in Blender 

- go back to Blender Preferences window on add-tab and click on "Install" button 

go back to Blender Preferences window on add-tab and click on "Install" button


- in right system tree view select "Downloads" and click on "screancast_keys.zip" file 
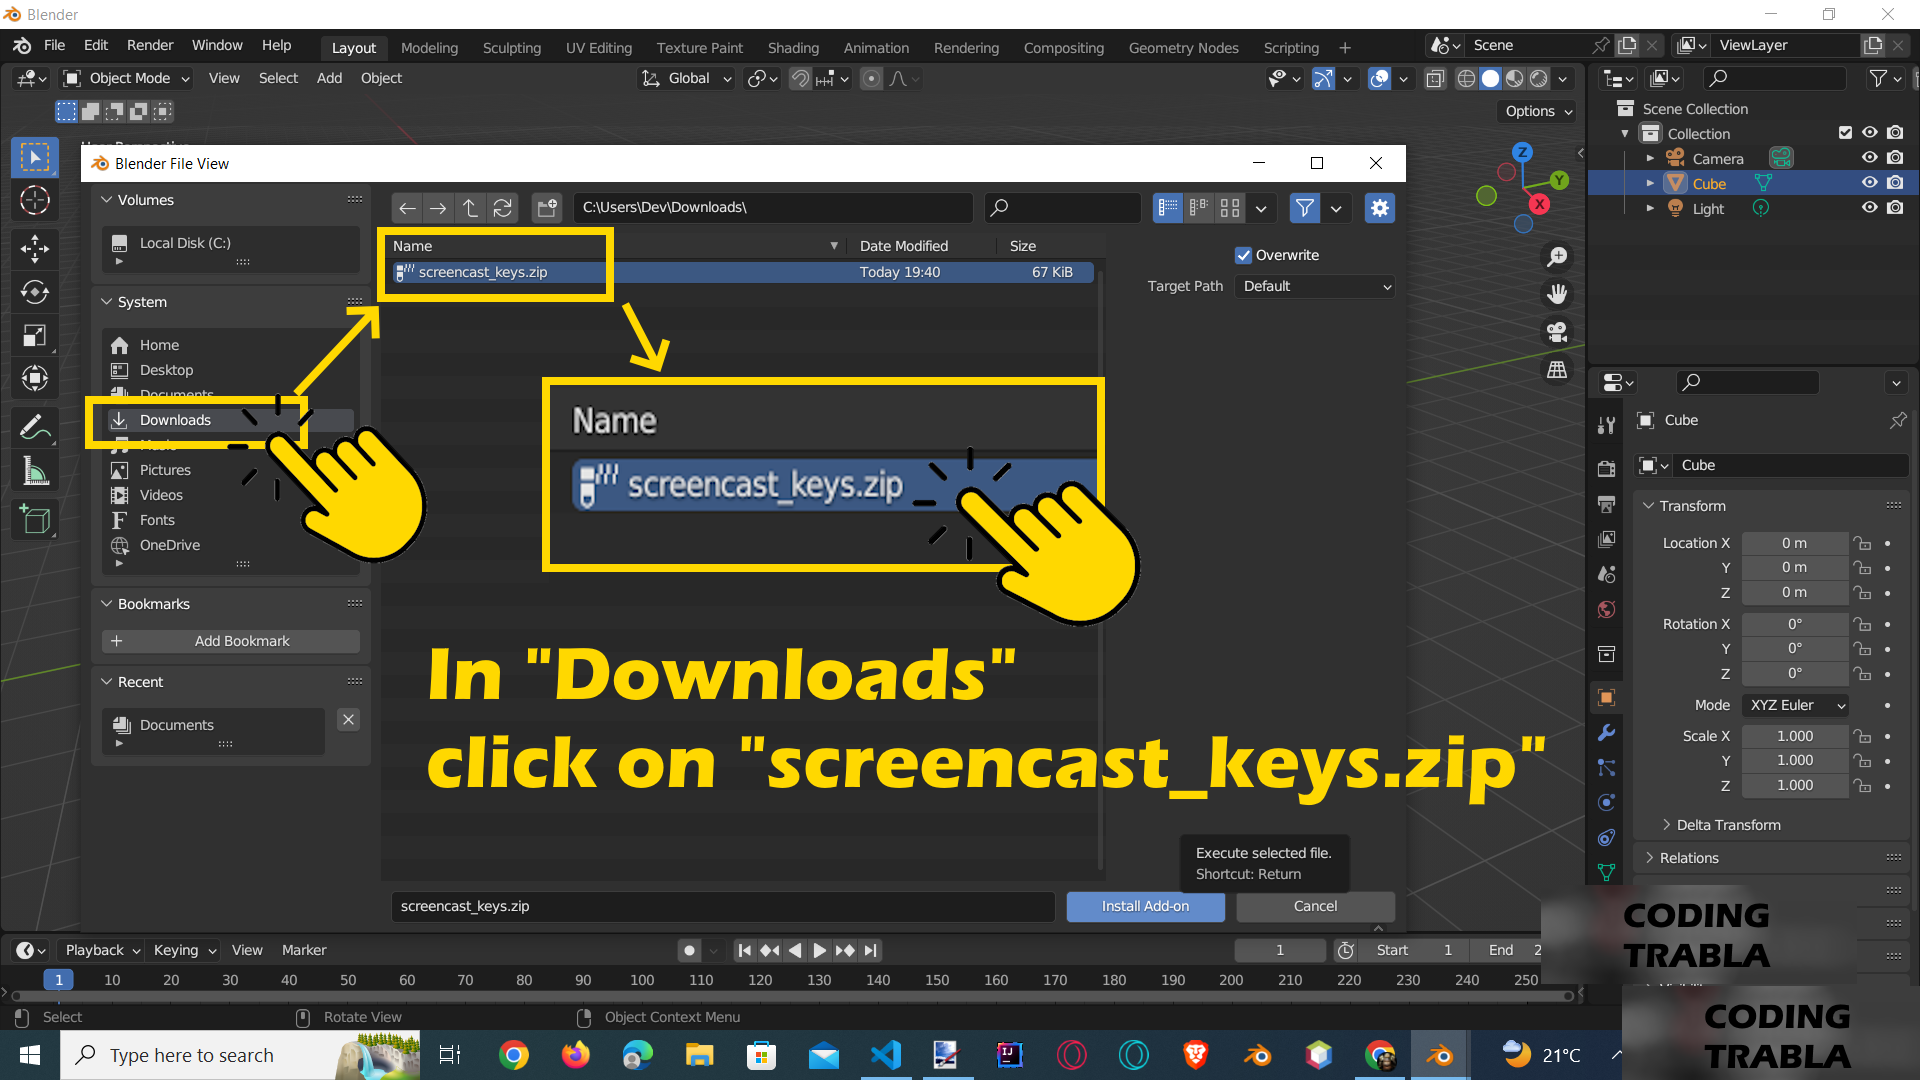

in right system tree view select Downloads and click on screancast_keys.zip file


- click on bottom right button "Install Add-on" 

click on bottom right button "Install Add-on"


- Hooray !!! Add-on appears in Blender Prefence - Add-ons window

Add-on appears in Blender Prefence - Add-ons window

5. Enable Screencast Keys add-on in Blender 

- in Blender Preferences windows on add-tab enable  Screencast Keys checkbox 

n Blender Preferences windows on add-tab enable  Screencast Keys checkbox

eanbled checkbox of blender plugin screencast keys


- click on rectangle to view details of add-on 

click on rectangle to view details of add-on

scroll down for more blender add-on settings

- close window "Blender Preferences"

close window Blender Preferences

6. Activate Screencast Keys add-on in Blender 

- press N button in blender ( you will see options tabs ) 

press N button in blender ( you will see options tabs )

- select tab Screencast Keys 

- enable checkbox to make it active 

enable checkbox "Screencast Keys" to make it active


- now click on View tab

now click on View tab


- change Focal Length from 50 to 51 and back to 50 

change Focal Length from 50 to 51 and back to 50


- now we can see mouse in left right corner 

now we can see mouse in left right corner


- go to Screencast Keys tab and make your display setup

go to Screencast Keys tab and make your display setup

Hooray !!! We've done it! Perfect!

How to build mp4 video in Blender

Trabla : How to build mp4 video in Blender


tutorial how to build mp4 video in blender video editor

What is Blender?


Blender is a free and open-source 3D computer graphics software toolset used for creating animated films, visual effects, art, 3D printed models, motion graphics, interactive 3D applications, and computer games.

Blender's features include 3D modelling, UV unwrapping, texturing, raster graphics editing, rigging and skinning, fluid and smoke simulation, particle simulation, soft body simulation, sculpting, animating, match moving, rendering, motion graphics, video editing, and compositing.

Movies made with Blender


Where to download Blender?


You can download the latest Blender software from Blender Official Website: https://www.blender.org/

blender free software official website

Solving :


Watch on YouTube

1.  Run Blender app

run blender application on windows 10


2. In Blender's Start dialogue click on Video Editing menu item

in blender start dialog click on Video Editing


3. Compose your video in Blender ( with sound )

compose video with sound audio in blender


4. Disable showing second in the timeline ( View -> Show seconds ( Ctrl +T )

disable showing seconds in blender timeline


timeline with frame numbers in blender


5. Set Scene->Dimensions->Frame End value to end of your video

set frame end in scene menu - blender video editor

result of changing end frame in blender editor


Hooray !!! Now we are ready to build video :)

6.  Scroll down Scene menu in top right

scroll down scene menu in blender

scene menu after scrolling in blender


7. Click on File Format menu in Blender

blender output file format selection

8. Select FFmpeg video format

select ffmpeg file format in blender


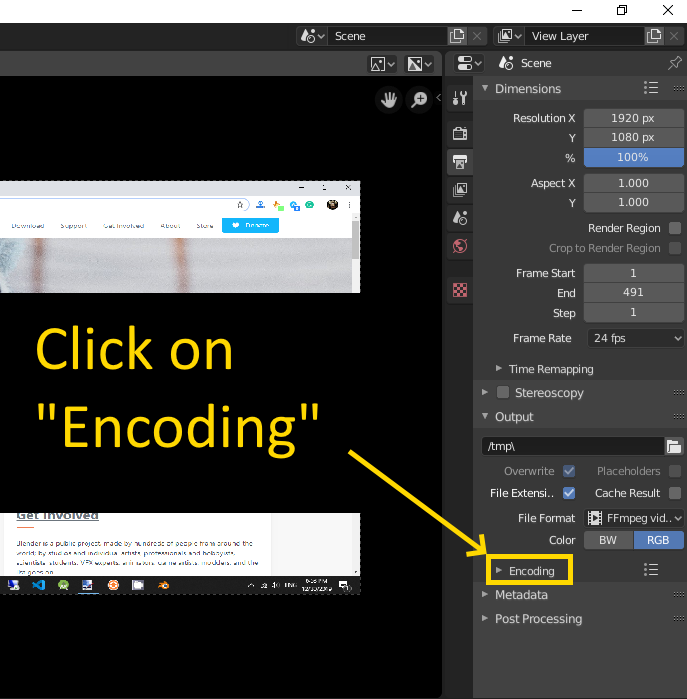
9. Click on "Encoding"

changing encoding in blender

expanded encoding dialog in blender


10. Click on "Container" - select MPEG-4


select mp4 MPEG-4 video container in Blender


11. Select Audio Codec - AAC  ( BY DEFAULT NO SOUND !!! )

select audio codec for video in blender


12.  Render mp4 video :) ( with sound )
- in top menu click on Render -> Render Animation ( Ctrl + F12 )

render than render animation menu in blender

blender rendering animation


13. Result = mp4 video

mp4 video done with blender