Showing posts with label eCommerce. Show all posts

Install Thelia 2.3.4 open source ecommerce on Windows localhost via XAMPP 7.1.10

Trabla: Install Thelia 2.3.4 open source php Symfony ecommerce on Windows 7 localhost via XAMPP 7.1.10


Install Thelia 2.3.4 open source ecommerce on Windows localhost via XAMPP 7.1.10


Solving:


Steps:


1. Download and install xampp 7.1.10 
DO NOT START XAMPP Control Panel

2. Download Thelia 2.3.4 ecommerce source files

3. Unzip thelia archive

4. Create folder \thelia in c:\xampp\htdocs
e.g.  c:\xampp\htdocs\thelia

5. Copy all files from unzipped archive into c:\xampp\htdocs\thelia

6. Run xampp as administrator

7. Apache config changes httpd.conf

find
DocumentRoot "C:/xampp/htdocs"
<Directory "C:/xampp/htdocs">

change to
DocumentRoot "C:/xampp/htdocs/thelia/web"
<Directory "C:/xampp/htdocs/thelia/web">

save and close 

8. php.ini changes

find max_execution_time=30
change to max_execution_time=1200

find  memory_limit=128M
change to  memory_limit=512M

find max_input_time=60
change to max_input_time=600

find post_max_size=8M
change to post_max_size=20M

find ;extension=php_intl.dll
change to ( remove semicolon ; ) extension=php_intl.dll

save and close

9. Start Apache and MySQL

10. In browser goto http://localhost/phpmyadmin
click on SQL tab and copy / paste following SQL to create DB and user for Thelia

CREATE DATABASE `thelia` 
DEFAULT CHARACTER SET utf8 COLLATE utf8_general_ci;

CREATE USER 'thelia-owner'@'localhost'; 
CREATE USER 'thelia-owner'@'127.0.0.1';
CREATE USER 'thelia-owner'@'::1';

SET PASSWORD FOR 'thelia-owner'@'localhost' = PASSWORD('thelia123');
SET PASSWORD FOR 'thelia-owner'@'127.0.0.1' = PASSWORD('thelia123');
SET PASSWORD FOR 'thelia-owner'@'::1' = PASSWORD('thelia123');


GRANT ALL PRIVILEGES ON `thelia`.* TO 'thelia-owner'@'localhost' WITH GRANT OPTION;
GRANT ALL PRIVILEGES ON `thelia`.* TO 'thelia-owner'@'127.0.0.1' WITH GRANT OPTION;
GRANT ALL PRIVILEGES ON `thelia`.* TO 'thelia-owner'@'::1' WITH GRANT OPTION;

click "Go" button

11. In browser goto http://localhost  and go throw Thelia web installation wizard

For DB connection use
host : localhost
username : thelia-owner
password : thelia123

choose database : thelia

Enjoy !!! Thelia 2.3.4 ecommerce !!!


Install Shopware 5.3.3 community edition opensource ecommerce via Bitnami on Windows

Trabla:  Install Shopware 5.3.3 community edition php opensource ecommerce shop platform via Bitnami installer on Windows 7 localhost


Install Shopware 5.3.3 community edition opensource ecommerce via Bitnami on Windows


Solving:


Install Sylius 1.0.0 e-commerce on Windows 7 localhost via XAMPP 7.1.10

Trabla: Install Sylius 1.0.0 e-commerce on Windows 7 localhost via XAMPP 7.1.10
( using PHP Composer, node.js , yarn )


Install Sylius 1.0.0 e-commerce on Windows 7 localhost via XAMPP 7.1.10


Sylius - eCommerce PHP framework built on top of Symfony with component-based architecture and format-agnostic rendering.

Sylius e-commerce official site - http://sylius.org/

Solving:


Steps:


1. Download and install:
 - XAMPP 7.1.10 for Windows
 - Composer packet manager for PHP
 - Node.js
 - Yarn

3.Run XAMPP Control Panel
 - Open php.ini
 - Find memory_limit=128M change to memory_limit=512M
 - Find max_execution_time=30 change to max_execution_time=600
 - Find ;extension=php_intl.dll change to extension=php_intl.dll ( remove ; )
 - Find ;opcache.enable=1 change to opcache.enable=1 ( remove ; )
 - Add to last line zend_extension = "C:\xampp\php\ext\php_opcache.dll"
 - Save and close
 - Run Apache + MySQL

4. Open browser goto http://localhost/phpmyadmin/
 - Click on SQL Tab
 - Copy & paste following SQL script to create DB and user

CREATE DATABASE `sylius`
DEFAULT CHARACTER SET utf8 COLLATE utf8_general_ci;
CREATE USER 'sylius-owner'@'localhost';
CREATE USER 'sylius-owner'@'127.0.0.1';
CREATE USER 'sylius-owner'@'::1';
SET PASSWORD FOR 'sylius-owner'@'localhost' = PASSWORD('sylius123');
SET PASSWORD FOR 'sylius-owner'@'127.0.0.1' = PASSWORD('sylius123');
SET PASSWORD FOR 'sylius-owner'@'::1' = PASSWORD('sylius123');
GRANT ALL PRIVILEGES ON `sylius`.* TO 'sylius-owner'@'localhost' WITH GRANT OPTION;
GRANT ALL PRIVILEGES ON `sylius`.* TO 'sylius-owner'@'127.0.0.1' WITH GRANT OPTION;
GRANT ALL PRIVILEGES ON `sylius`.* TO 'sylius-owner'@'::1' WITH GRANT OPTION;

- Click Go button

5. Create folder silyus in  C:\xampp\htdocs
e.g. C:\xampp\htdocs\silyus

6. Run Windows CMD execute following commands

CD C:\xampp\htdocs\silyus
composer create-project sylius/sylius-standard . 1.0.0 --no-dev
...
php bin/console sylius:install -e prod --no-debug
...
yarn install
...
yarn run gulp

7. Change DocumentRoot in Apache config
- stop Apache
- open Apache->httpd.conf
- find

DocumentRoot "C:/xampp/htdocs"
<Directory "C:/xampp/htdocs">

change to

DocumentRoot "C:/xampp/htdocs/sylius/web"
<Directory "C:/xampp/htdocs/sylius/web">

- save and close
- start Apache

Enjoy Sylius 1.0.0 e-commerce on localhost !!!

P.S. Admin UrL   - http://localhost/admin/login


Install Alegro Cart 1.2.9 with XAMPP 5.6.28 on Windows 7 localhost - PHP eCommerce

Trabla: Install Alegro Cart 1.2.9 with XAMPP 5.6.28 on Windows 7 localhost - PHP eCommerce

Install Alegro Cart 1.2.9 with XAMPP 5.6.28 on Windows 7 localhost - PHP eCommerce


Alegro Cart - free open source E-Commerce shopping cart solution, MVC Design, modular template system, PHP 5, MySQL 5 database, multiple languages and autoupdate.

Solving:


Watch on YouTube


SQL script to create user and database for Alegro Cart 1.2.9, used in tutorial:


CREATE DATABASE `alegro` 
DEFAULT CHARACTER SET utf8 COLLATE utf8_unicode_ci;

CREATE USER 'alegroowner'@'localhost'; 
CREATE USER 'alegroowner'@'127.0.0.1';
CREATE USER 'alegroowner'@'::1';

SET PASSWORD 
FOR 'alegroowner'@'localhost' = PASSWORD('alegro123');
SET PASSWORD 
FOR 'alegroowner'@'127.0.0.1' = PASSWORD('alegro123');
SET PASSWORD 
FOR 'alegroowner'@'::1' = PASSWORD('alegro123');


GRANT ALL PRIVILEGES ON 
`alegro`.* TO 'alegroowner'@'localhost' WITH GRANT OPTION;
GRANT ALL PRIVILEGES ON 
`alegro`.* TO 'alegroowner'@'127.0.0.1' WITH GRANT OPTION;
GRANT ALL PRIVILEGES ON 
`alegro`.* TO 'alegroowner'@'::1' WITH GRANT OPTION;


Install X-Cart 5.3.2.2 on Windows 7 localhost XAMPP 5.6.28 - opensource PHP shopping cart

Trabla: Install X-Cart 5.3.2.2 on Windows 7 x64 localhost XAMPP 5.6.28 - opensource PHP shopping cart for eCommerce


Install X-Cart 5.3.2.2 on Windows 7 localhost XAMPP 5.6.28 - opensource PHP shopping cart


X-Cart - free shopping cart software, easy to use, easy to maintain, easy to modify. X‑Cart is the PCI DSS compliant software you can run on your own server. It works on any hosting, even a shared one
Official Site - https://www.x-cart.com/

Solving:


Watch on YouTube

SQL script to create database and user for X-Cart 5.3.2.2, used in tutorial:

CREATE DATABASE `xc5` 
DEFAULT CHARACTER SET utf8 COLLATE utf8_general_ci;

CREATE USER 'xc5-owner'@'localhost'; 
CREATE USER 'xc5-owner'@'127.0.0.1';
CREATE USER 'xc5-owner'@'::1';

SET PASSWORD 
FOR 'xc5-owner'@'localhost' = PASSWORD('xc5123$%');
SET PASSWORD 
FOR 'xc5-owner'@'127.0.0.1' = PASSWORD('xc5123$%');
SET PASSWORD 
FOR 'xc5-owner'@'::1' = PASSWORD('xc5123$%');


GRANT ALL PRIVILEGES ON 
`xc5`.* TO 'xc5-owner'@'localhost' WITH GRANT OPTION;
GRANT ALL PRIVILEGES ON 
`xc5`.* TO 'xc5-owner'@'127.0.0.1' WITH GRANT OPTION;
GRANT ALL PRIVILEGES ON 
`xc5`.* TO 'xc5-owner'@'::1' WITH GRANT OPTION;


Install Magento CE 2.1.2 on Windows 7 localhost ( XAMPP 5.6.24 ) - open source PHP eCommerce

Trabla: Install Magento CE 2.1.2 on Windows 7 x64 localhost ( XAMPP 5.6.24 ) - open source PHP eCommerce


Install Magento CE 2.1.2 on Windows 7 localhost ( XAMPP 5.6.24 ) - open source PHP eCommerce

Solving:


Install Arastta 1.4.2 eCommerce on Windows 7 localhost - opensource PHP Shopping Cart

Trabla: Install Arastta 1.4.2 eCommerce on Windows 7 localhost ( XAMPP 7.0.9 with PHP7 ) - opensource PHP Shopping Cart


Install Arastta 1.4.2 PHP shopping cart eCommerce on Windows tutorial


Arastta is the next generation of eCommerce software built with modern technologies such as Symfony, Bootstrap, jQuery, Swift Mailer, RESTful API etc. Thanks to it's modular and lightweight structure, Arastta provides an awesome marketplace for theme and extension developers. Arastta is a Free and Open Source project with contributors from all over the world.

Solving:


Install Arastta 1.3.4 on Windows

Trabla: Install Arastta 1.3.4 eCommerce  on Windows ( XAMPP 5.6.21 )


Install Arastta 1.3.4 on Windows 7 tutorial


Arastta is the next generation of Open Source eCommerce software built with modern technologies such as Symfony, Doctrine (soon), MVC, Bootstrap, jQuery, Swift Mailer etc.


Latest Tutorial - Install Arastta 1.4.2 eCommerce on Windows 7 localhost ( XAMPP 7.0.9 with PHP7 ) - opensource PHP Shopping Cart 

Solving:

1.  Download and install XAMPP 5.6.21 from official site:
https://www.apachefriends.org/download.html

Install Arastta 1.3.4 on Windows 7 XAMPP tutorial 1


2. Download Arastta 1.3.4  installer from official site:
https://arastta.org


Install Arastta 1.3.4 on Windows 7 XAMPP tutorial 2


Install Arastta 1.3.4 on Windows 7 XAMPP tutorial 3

Install Arastta 1.3.4 on Windows 7 XAMPP tutorial 4


3. Create folder \arastta in XAMPP htdocs folder
C:\xampp\htdocs\arastta
and copy all files from downloaded  Arastta 1.3.4  .zip source

Install Arastta 1.3.4 on Windows 7 XAMPP tutorial 5


4. Run XAMPP Control Panel 
- start Apache
- start Database

Install Arastta 1.3.4 on Windows 7 XAMPP tutorial 6


5. Open in browser following url to start Arastta 1.3.4  web installation
http://localhost/arastta/install/index.php
- Select language
- Click "Next"

Install Arastta 1.3.4 on Windows 7 XAMPP tutorial 7


6.  "Database" page
Install Arastta 1.3.4 on Windows 7 XAMPP tutorial 8

Now we need to create Database for Arastta 1.3.4

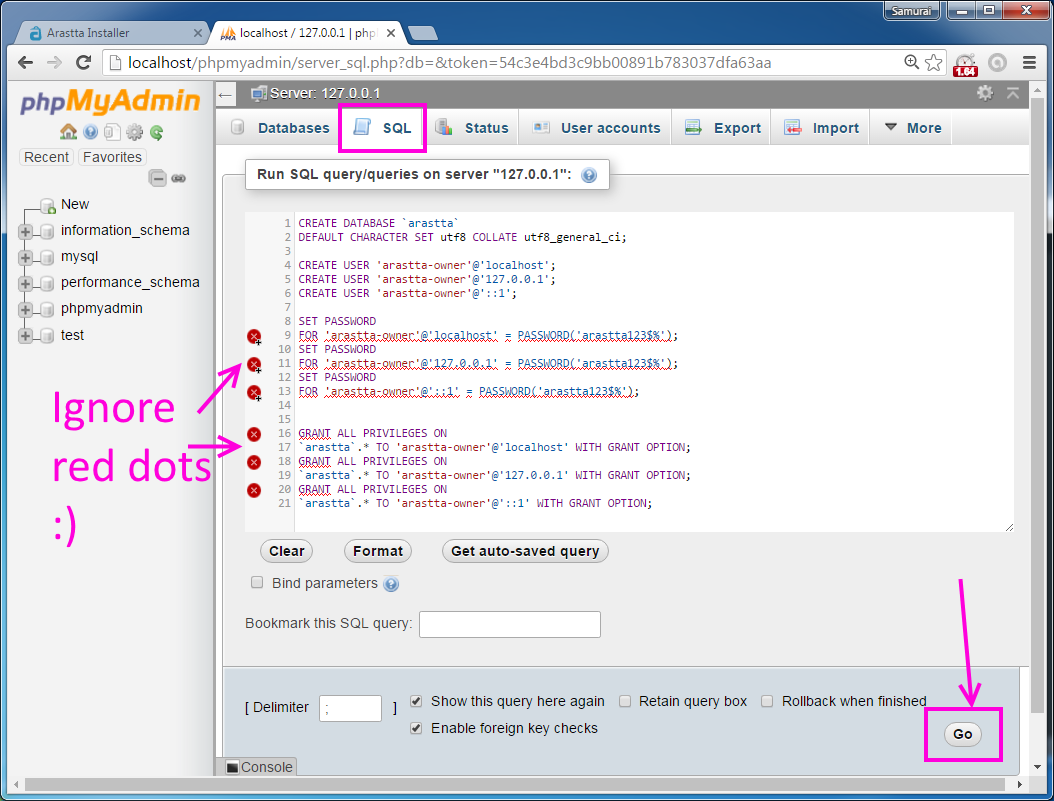
1) Open phpMyAdmin in new browser tab (or window :) ) - http://localhost/phpmyadmin
2) Open SQL tab
3) Execute following query

Install Arastta 1.3.4 on Windows 7 XAMPP tutorial 9

CREATE DATABASE `arastta` 
DEFAULT CHARACTER SET utf8 COLLATE utf8_general_ci;

CREATE USER 'arastta-owner'@'localhost'; 
CREATE USER 'arastta-owner'@'127.0.0.1';
CREATE USER 'arastta-owner'@'::1';

SET PASSWORD 
FOR 'arastta-owner'@'localhost' = PASSWORD('arastta123$%');
SET PASSWORD 
FOR 'arastta-owner'@'127.0.0.1' = PASSWORD('arastta123$%');
SET PASSWORD 
FOR 'arastta-owner'@'::1' = PASSWORD('arastta123$%');


GRANT ALL PRIVILEGES ON 
`arastta`.* TO 'arastta-owner'@'localhost' WITH GRANT OPTION;
GRANT ALL PRIVILEGES ON 
`arastta`.* TO 'arastta-owner'@'127.0.0.1' WITH GRANT OPTION;
GRANT ALL PRIVILEGES ON 
`arastta`.* TO 'arastta-owner'@'::1' WITH GRANT OPTION;

Install Arastta 1.3.4 on Windows 7 XAMPP tutorial 10

Install Arastta 1.3.4 on Windows 7 XAMPP tutorial 11

Go back  to Arastta 1.3.4  installarion page - fill all fields
( use
database name - arastta
user arastta-owner
password ( for user ) - arastta123$%
)
and click "Next"
Install Arastta 1.3.4 on Windows 7 XAMPP tutorial 12


7. "Settings" page - enter your store info and click "Next"

Install Arastta 1.3.4 on Windows 7 XAMPP tutorial 13

Install Arastta 1.3.4 on Windows 7 XAMPP tutorial 14


8. Ready !!! Hooray!!!

Install Arastta 1.3.4 on Windows 7 XAMPP tutorial 15

Enjoy Arastta 1.3.4

Install Arastta 1.3.4 on Windows 7 XAMPP tutorial 16

Install Arastta 1.3.4 on Windows 7 XAMPP tutorial 17

Install Arastta 1.3.4 on Windows 7 XAMPP tutorial 18

Admin Panel
Install Arastta 1.3.4 on Windows 7 XAMPP tutorial 19

Install Arastta 1.3.4 on Windows 7 XAMPP tutorial 20

Install Arastta 1.3.4 on Windows 7 XAMPP tutorial 21